Showing posts with label sewing. Show all posts

Tuesday, September 18, 2018

Light, Glorious Light!


It's actually hard for me to describe how excited I am about this - my Singer has a light for the first time in YEARS.

When it first burned out, I took it in for a tune-up that it needed, anyway. The repairperson told me that I needed to order a different bulb than the ones he had. Ok, no problem. I bought my bulb. I could not get it in to the machine!

Fast forward about 4 years, when my darling sister, Lisa, emailed me a link.

You. Guys. It works. It cost me about $1.

Wednesday, May 16, 2018

Review: SEW...The Garment-Making Book of Knowledge

My sister introduced me to Barbara Emodi's blog a little while ago. I love it! It's one of my favorite sewing blogs.

When I heard she was writing a book, SEW The Garment-Making Book of Knowledge: Real-Life Lessons from a Serial Sewist, I was super excited! Disclosure: the publisher sent me a PDF of the book, but all opinions are mine!

I love Barbara's book! I even read it on the bus - which is saying a lot, since reading on the bus makes me rather motion sick. It's full of tips and tricks. Barbara's writing style is relaxed and happy. She's informative without being preachy.

One of the features that I love in the book is her mini lessons. One's about v-style necklines, and I decided to try it, since I've had a few neckline fails, lately.

I took an old tee and cut away the neck into a v-neck shape. I then cut a binding strip 1 and 3/8-inches wide and the full length of the fabric.


I ended up marking the exact location of the bottom of the v with wash-away marker. Barbara doesn't say to do this, but I felt I really needed it to hit the mark.


Is it perfect? No. Is it better than what I've done, lately? YES! I think I just need to practice more. Also, maybe a little glue basting is in order, for me, until I've tried it more than once.


Wednesday, December 06, 2017

Project Journal: Ponte Pants

I don't wear pants very much, but I took a chance on McCall's 6173, and I'm really happy that I did!

This is not me. This is a model who is waaaaay taller than thinner than I ever have been.
Pattern: McCall's 6173, view A-ish, size L, with petite adjustments that were marked on the pattern paper.
Fabric: Telio Ponte Leggero Knit in black 65% Rayon/31% Nylon/4% Spandex. I washed the fabric in cold water and dried it in a low dryer. It sat around a bit before I had a chance to use it, so I also ran it through a steam refresh cycle in my dryer before I cut it out.
Notions: nylon zipper, hook and eye, 1-inch elastic
Tools: Sewing machine with zipper foot, edgejoining foot (for stitch in the ditch) and regular foot. Serger with  Four-Thread Ultra-Stretch Mock Safety Stitch for seams and narrow coverstitch for hems, pressing tools (lots of steam from my iron and a clapper, mostly).
Changes:
- No zippers on the legs.
- I serged the darts and all seams except the fly area and waistband finish. I reinforced the crotch seam with a line of sewing machine stitches within the seam allowance of the serged seam.
- I cut my own waistband and reinforced it with elastic, using techniques from The Busy Woman's Sewing Book. It's all of the comfort of an elastic waistband, but with a tailored look.
- From the same book, I used the two-step fly - a zipper fly with just two lines of stitching! I did have to do the second step over again, after basting a little bit, since it went rather off the rails the first time.
Verdict: On the first wear, these are super-comfy! I hope the fabric holds up well. The legs are much looser in the calf area than in the photo, so if you want a fitted calf, definitely do a basted fitting to check it. This is the most comfortable, best-fitting waistband I've ever worn.

Wednesday, November 15, 2017

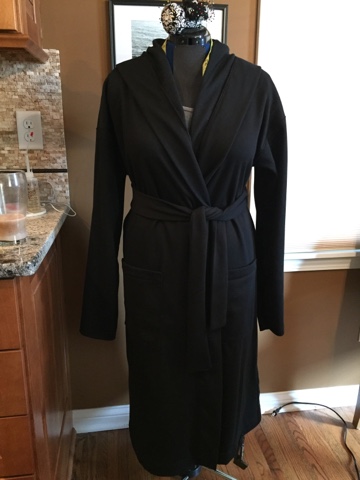
Robe for Dee

Remember my peacock robe? This is same pattern, done up in black sweatshirt fabric, before the sleeves were hemmed. 

Looooooooooooong sleeves. Not messing around!

I made it the same way as before, but this time I didn't cheat and leave off the belt carriers and pockets. Easy peasy.

Wednesday, November 08, 2017

Easy Skirt

Another version of Stretch and Sew 445!


Changes from my last try:

- I used the Elastic Waist Facing method I learned in The Ultimate Guide to Sewing Knit Fabrics Craftsy class by Linda Lee with this awesome Waistband Elastic by Dritz.

(If you use my Craftsy affiliate link you'll save 25% off her class. Cannot be combined with any other coupons. Expires January 11, 2018.)

- I altered the fit a little bit to make the hem about 2 inches narrower than patterned. It makes the skirt a little more body-conscious without being super-tight.

- The fabric is a knit I picked up at the Textile Center's garage sale in April. It is very fluid and drapey. I think it might be rayon? It doesn't curl at the cut edge and feels cool and dry to the touch.

- I serged my darts, instead of stitching them on the sewing machine. I love the results!

- I couldn't get a blind hem to work, so I initially used a fusible to bond the hem in place. The fusible came partially unstuck after the first wash. (I wash in cold water and hang to dry.) So, I coverstitched the hem in place, instead. It looks great and I don't mind the look of a coverstitched hem.

Changes for next time:

- PRACTICE that waist facing technique, so that it's a little more even. Other than that, I LOVE it. It's definitely going to be my go-to skirt for when I want to feel put-together and cute.

Wednesday, October 18, 2017

Just A Simple Belt


A wide belt I had broke a few months ago, so I figured it was time to try making a belt. It was pretty straightforward. 

1) Buy a 2-inch-wide belt buckle from Dritz. 

2) Cut a strip from some black "yoga pant"-style knit fabric - 5 inches wide and as long as my waist measurement.

3) Bond a 2-inch-wide strip of fusible knit interfacing down the center of the fabric. 

4) Fold, unbonded sides together, and stitch, lengthwise, with a 1/2-inch seam allowance. 

5) Turn it rightside-out. Press so that the seam runs down the center of the back of the belt. 

6) Attach the belt to one side of the buckle. 

7) Try on, adjust for fit, and attach the other side of the belt to the other side of the buckle. 

Voila!

Wednesday, October 11, 2017

Carefree Apron Love


I picked up this Carefree Butcher Apron pattern a little while ago. I think "sample" means it must have been free? Maybe? In 1975? It's fairly common on both Ebay and Etsy, if you want a copy. I'm guessing McCall's Carefree patterns was that company's answer to Simplicity?

Check the awesome cover art. Girl in the red apron - are you getting married in that thing? Seriously. It's so big! 

Love the highlight over Notions. It appears to have been printed that way.

I made the shortest one, because this is kind of a fabric hog. Even with that, I had to piece a little bit of one of the backs and cut it upside down. It's in back, and mostly covered by the other side, so I expect to live. I also added 1-inch belt hardware to make the neck strap adjustable.

I also made the waist ties in black, since I think this cute mostly-white fabric would get pretty grubby if I was tying it all of the time. 


That's the shortest one! It hits me at my knee. The girl in the blue must be 14 feet tall. 

With that said, I LOVE this pattern. It has bust darts! I don't know if anyone else has this problem with overall-style aprons, but they sometimes slide around on me and before I know it, one of my boobs is hanging out of the apron. It kind of defeats the purpose of an apron. 

The fabric is a quilting cotton from SR Harris that's on the heavier end. I've decided it's impossible to find Paris-themed fabric that isn't at least a little crazy, so I might as well lean into it. If you look closely, you can see that this fabric is based on the story of three cats who go on vacation in Paris. They like the Eiffel tower and bicycles. It's adorable. 

I used a yellow chaco-liner for the first time for this project. It freaked me out a little, at first, since it didn't just wipe away the way the white stuff usually does. As soon as I finished sewing it, I applied quite a bit of Shout to the marks and washed it in the washing machine on cold. I laid it flat to dry. I generally air-dry most of the clothes I make, but I especially didn't want to put this in the dryer, in case the chalk hadn't come out all of the way.

It did come out! Yay! 

Wednesday, September 27, 2017

Review: All New Fabric Savvy by Sandra Bertzina


I first encountered Sandra Betzina in her wonderful Craftsy classes. So, I was super happy when I saw that she had a new version of a wonderful book: All New Fabric Savvy.

If, like me, you hoard magazine articles about different types of fabric and pore over fabric choices in blogs, this book is for you. If, also like me, you can never remember where you saw those great tips on sewing scuba fabric, this book is DEFINITELY for you!

Each entry gives you the background on the given fabric and also has tips on pretreating, pressing, hemming and (most importantly, for me) matching the fabric to the project so that you can get the most out of your sewing time.

My favorite resources are in the back of the book: a visual glossary of techniques, details on interfacing, presser feet, tools, choosing knit fabrics, determining fabric content, linings and stain removal.

The knit fabric section, in particular, is invaluable. I love that Sandra includes tips on choosing the best fabrics and also knowing when to stay away from certain fabrics that look great on the bolt but are either hard to sew, tend to pucker or just aren't worth it.

She even covers Cotton for Quilters and, instead of saying, "Just don't do it!" suggests the types of garments that work the best for those super-popular, cute and relatively inexpensive fabrics.

Overall, I recommend this book heartily for sewists of all experience levels.

Wednesday, September 20, 2017

Gray Shirt

This is Stretch & Sew 760, and I made it as sort of a test.

Would a Stretch & Sew pattern really work with woven fabric? The answer: yup, this one does. 

A lot of side-seam shaping and no darts might make this a good candidate for a plaid shirt. I would reshape the collar, though. 1975, I think? That collar could achieve liftoff!

The shirt-tail hem is fantastic. I'm planning on basically grafting it onto a lot of my other shirt/top patterns in the future.

Wednesday, September 13, 2017

Basement Sewing Space

What have I got to show you?

Last year, our water softener went haywire and flooded part of our basement because our floor drain backed up.

Fortunately, we have insurance for sewer backup, so after a little angst, we got it all cleaned up and had new carpet installed.

That room is what I would call semi-finished. It has carpeting and some drywall, but also some areas that are straight-up 1950s basement, complete with concrete walls that probably shouldn't ever have been painted, since now the paint is flaking off.

We had to move all of the stuff we were storing in there so that they could put in the carpet. Dee and I talked about it. She said, why not just make that your sewing cutting area and storage space? It already has closets.

I said, "I love you."

So, we did.

Weird closets that I will now stuff with my sewing stuff.

Cutting area. Storage under table for trash, scraps and patterns.


Tunes.

Boomer, plus some storage. (BEFORE)

Wednesday, September 06, 2017

New Knitting Bag!

Way back this spring, I stopped by Yarnover, met June Hemmons Hiatt and purchased a knitting belt from her. I wasn't looking to learn a new way to knit, but these things happen, apparently. :)

I really like the belt, but there was just one problem. The 30 cm needles I bought with the belt were too long for my favorite sock-knitting bag.


Obviously, I had to sew a new knitting bag, right? 

Enter Kwik Sew 3728, view B. I've written about using this pattern before, but it was a different view.

Oh, and I used this awesome Wonder Woman-themed fabric from Joann's.


I LOVE it! I made a few changes. 

- No piping. 
- Fusible fleece (Pellon 971f) to give it some body. 
- I used nylon webbing for the straps and buried them in the seam instead of attaching them to the sides. 


Wednesday, August 30, 2017

Thrifty Lined Shopping Bags!


If I had more time when I was working on Crafting the Resistance, I would have added this shopping bag! Instead, it's now available as a stand-alone sewing pattern on Craftsy and Etsy.

I designed the Thrifty Lined Shopping Bags to be easy to sew and fun to use. They are fully lined and can be cut out of a 40-inch-wide piece of fabric. This means they will fit on most quilting cottons, even if the yardage shrank a bit during prewashing.

These bags only require 1.3 yards of fabric if both lining and fabric are the same, or 2/3 of a yard of each fabric if they are different. You may find it easier to keep track of which layer is the lining and which is the outer bag if you use contrasting fabrics for your first few bags. 

Have you heard of the burrito method, but aren't sure you want to try it on a garment? I included step-by-step photos for using it, so this is a great first project to try that technique!

Thursday, August 24, 2017

Alternative Stuffing

In Crafting the Resistance, I told you I stuffed my pet bed with scraps and leftovers from other projects. I told you about that, here, too! Here's Travis, enjoying his bed last April.


So, you can see that the stuffing works! All it needs is a good shake and maybe some massaging to be very comfy. But, it's pretty heavy and bulky, which may not be too practical if you want to, say, toss your pet bed in the back of your car when you take your pets with you on vacation or just give a bed to a friend of yours without making them feel like you're passing off a bag of old laundry to them.


Here's an alternative, if you want one. Make your bed fleece cover and zippered insert as written in the book. Then, instead of stuffing the insert with scraps, use the same pattern pieces to cut out 2 layers of 1-inch foam. You may need to trim the foam a bit to get it into the insert, but experiment to see what works best for you. This version is light and lofty!

This could work as a cushion for people, too, of course!

Thursday, August 17, 2017

Book Launch Party!


Come meet me and get first crack at my new book, Crafting the Resistance: 35 Projects for Craftivists, Protestors and Women Who Persist. There will be samples from the book to be check out, books to get signed, donut holes to be eaten, and new friends to meet.

“Craftivism is a way of looking at life where voicing opinions through creativity makes your voice stronger, your compassion deeper, and your quest for justice more infinite.” ~ Betsy Greer

Spend your Friday evening with us and let's start Crafting the Resistance.

Let us know you're coming!


If you can't make it, try to catch me at the other events where I will be vending! No matter where you buy your book, I will sign it.

Tuesday, August 15, 2017

Purple Reins of Power Scarf


I had to include a small nod to Prince in the book. Now, I know that he isn't connected in everyone's mind to liberation and rights for all. But, for me, his music was a window into a world where it was OK to be a woman, man, or something people just didn't get.

I included tips in the book about how to create a very neat hemmed edge, even in a slippery fabric like polyester chiffon. I do have this warning, though - in general, more expensive materials will be easier to work with. No matter what fabric you use, make sure to test your stitching!!!! That is one of those things that is always true, but even more crucial when you're using a tricky fabric.

Thursday, August 10, 2017

Freerange Pussyhat Symbols


One of my coworkers thought this looked like a bow and I spent about 4 hours brooding about it. It just goes to show that you can only see some things if you are looking for them!

This is practically a no-effort project, so, like the yellow rose pin, would make a good first project for a beginner.

Tuesday, August 08, 2017

Yellow Rose Pins


The yellow rose was a symbol adopted by suffragettes. It was connected with purity and truth, since it's the color of sunlight. This project is very, very easy and would make a pretty good introduction to sewing.

Thursday, August 03, 2017

Nasty Nag Pouch


You don't have to use this pouch to nag yourself. It could also be used to "nag" other people. Fill it up with to-nag notes or simply use it to keep your daily supplies in order.

Tuesday, August 01, 2017

Jabot-Inspired Scarf


This scarf needs just a little lace and shirting fabric to come together. It's perfect for days when you want just a little more pep in your step and would also make a pretty good gift, in my opinion.

Thursday, July 27, 2017

PussyHat Bombs


I want to stipulate that these are 100% nonviolent bombs. Make them from leftover scraps and share them with the world!